
Installing pull handles on closet doors may seem like a simple task, but doing it correctly ensures a seamless and professional-looking result. Whether you’re a seasoned DIYer or a novice tackling your first home improvement project, this comprehensive guide will provide you with the knowledge and techniques you need to install pull handles like a pro.
The first step in installing pull handles is choosing the right ones for your closet doors. Consider the following factors:
Material: Pull handles come in various materials, including metal, wood, and plastic. Choose a material that complements the style of your doors and closet space.
Size and Shape: The size and shape of the handles should be proportionate to the closet doors. For larger doors, consider longer handles, while smaller doors may look better with shorter, rounded handles.
Function: Determine the type of handle that best suits your needs. Flush handles lie flat against the door, while recessed handles sit slightly below the surface.
Once you have chosen the handles, it’s time to mark and drill the holes for installation. Follow these steps:
Place the handle against the door where you want it to be located.
Mark the center of the handle’s mounting screws with a pencil.
Use a drill bit that matches the diameter of the screws to drill pilot holes at the marked locations.
Now it’s time to install the handles. Here’s what to do:
Align the handle with the pilot holes and insert the screws.
Gently tighten the screws using a screwdriver or drill until the handle is secure.
Avoid overtightening, as this can strip the screws or damage the door.
After installing the handles, it’s essential to level them and make any necessary adjustments. Use a level to check if the handles are even from top to bottom and side to side. If necessary, use a drill or screwdriver to adjust the screws until the handles are perfectly level.
Finally, add the finishing touches to ensure a professional-looking installation.
Wipe down the handles with a damp cloth to remove any fingerprints or smudges.
Inspect the door and handles for any gaps or imperfections.
If there are any gaps, use a small amount of wood filler to fill them in and create a smooth surface.
By following these steps, you can install pull handles on your closet doors with precision and confidence, giving your closet a professional and organized look.
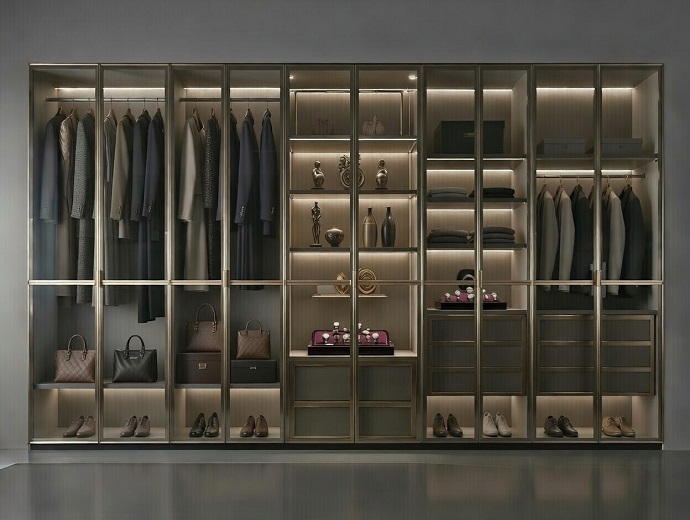
Compare aluminum, wood, and steel wardrobe frames to find the perfect balance of durability, minimalist aesthetics, and long-term value.
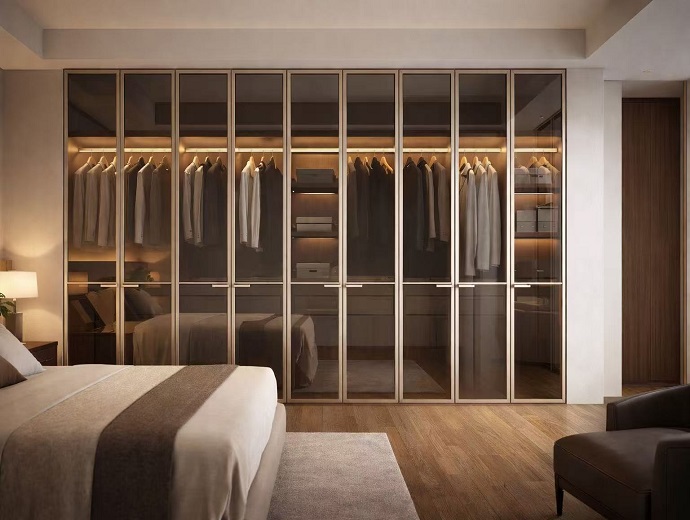
Comparing aluminum, wood, and steel for wardrobe and closet frames. Discover which material offers the best durability, aesthetics, and value for modern furniture in 2026.
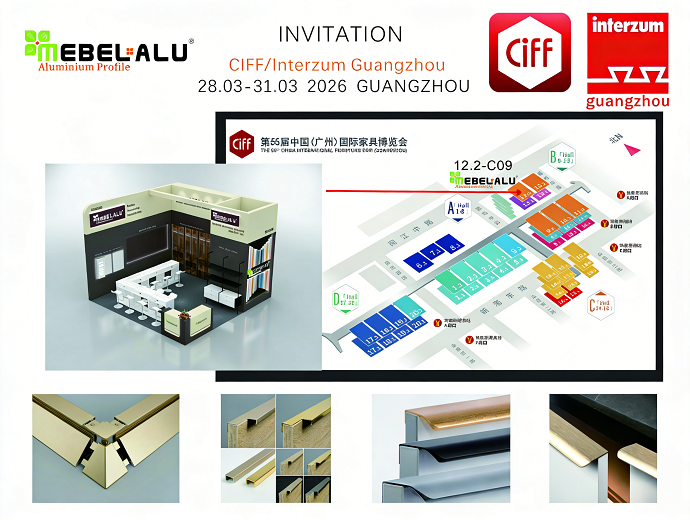
Sincere invitaion of all to attend our exhibition on march 28 to 31, 2026, at the China Import and Export Fair Complex in Guangzhou.

In interior design, we often fixate on the showstopping elements: marble waterfall islands, statement lighting fixtures, and wide-plank oak flooring. Yet ask any leading designer what truly elevates a standard home to a custom, thoughtfully curated space, and they’ll direct you to the small details—above all, to the hardware. If you’re here, you’ve moved beyond […]

In interior design, we often fixate on the most eye-catching elements: marble waterfall islands, statement lighting, and wide-plank oak floors. Yet any top designer will tell you the real difference between a standard home and a truly custom space lies in the details. Above all else, it’s the hardware. If you’re reading this, you’ve already […]

In the world of interior design, we often obsess over the big-ticket items: the marble waterfall island, the statement lighting, the wide-plank oak flooring. But ask any top designer what truly separates a custom home from a cookie-cutter build, and they’ll point to the details. Specifically, they’ll point to the hardware. If you’re reading this, […]

In the hierarchy of interior design, few elements are as undervalued—and as impactful—as the humble pull handle. It is the first thing your hand touches when you enter a room, the glint of light across a kitchen run, and the final detail that can either elevate a space or relegate it to “builder-grade” obscurity. We […]

In the world of interior design, we often talk about big-ticket items: the marble island, the statement lighting, the wide-plank oak flooring. But ask any top designer what truly defines a space, and they’ll point to the details. Specifically, they’ll point to the hardware. If you’re reading this, you’re likely past the basic “knobs vs. […]

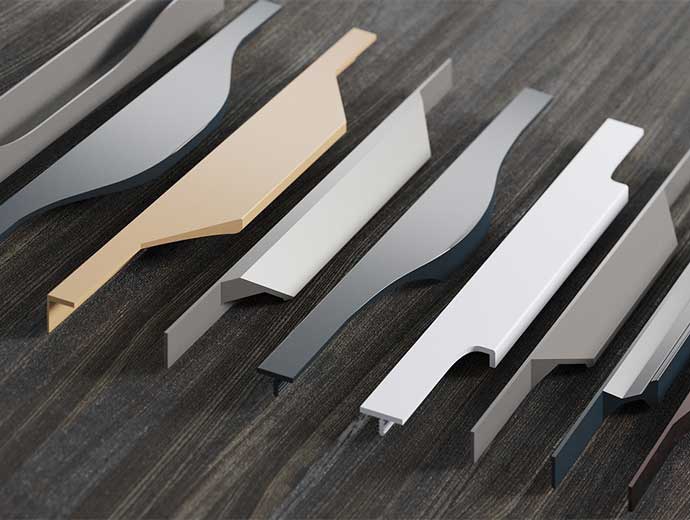
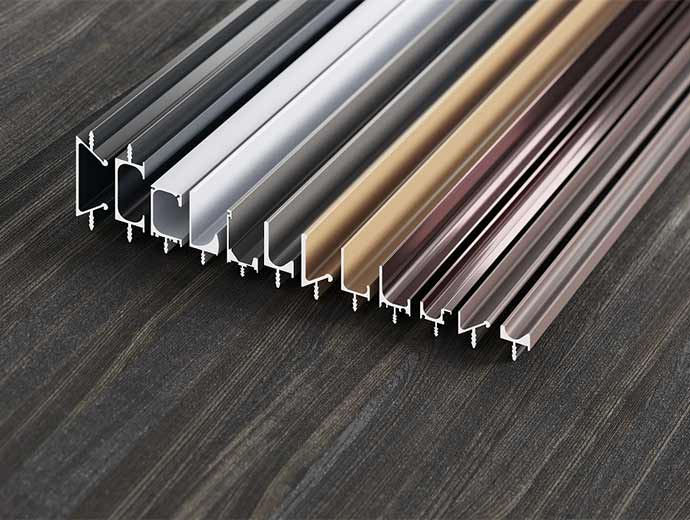
Modern home design in 2027 centers simplicity, sustainability, and tactile minimalism—shifting attention from ostentatious hardware to subtle, functional touches that blend seamlessly with cabinetry and furniture. This evolution has catapulted aluminum profile handles into the spotlight as a go-to hardware solution for both homeowners and interior designers. Key 2027 Interior Trends Driving Aluminum Profile Handle […]

Aluminum profile handles are lightweight, durable, corrosion-resistant, and cost-effective hardware, growing in popularity for cabinetry, furniture, and industrial enclosures in 2027. This guide breaks down key considerations to help you select the ideal handle that balances functionality, style, and long-term performance. 1. Match Handle to Application and Aluminum Profile Type Before shopping, clarify your handle’s […]
Aluminum profile handles are lightweight, durable, and sleek hardware solutions that blend uncompromising functionality with modern, adaptable aesthetics. This guide explores their technical and design advantages, offers actionable, globally accessible integration tips for kitchen cabinets, bathroom vanities, wardrobes, and office furniture, covers 2027 installation best practices, and highlights emerging material and finish trends. Aluminum profile […]

Aluminum Handle for Kitchen Cabinet: The Smart Fusion of Modern Design and Enduring Strength Aluminum Handle for Kitchen Cabinet The kitchen cabinet handle is more than a tool; it is the handshake of the home, the point where design intention meets daily life. In this crucial intersection, material choice becomes paramount. Among the various options […]

Wholesale Cabinet Handles: Partnering with Precision for Scalable Elegance Wholesale Cabinet Handles In the interconnected world of high-volume kitchen manufacturing, bespoke cabinetry, and large-scale residential or hospitality developments, the selection of hardware is a decision that reverberates far beyond a single installation. For businesses that operate at scale—from cabinet manufacturers and architectural woodworkers to luxury […]

Cabinet Door Pull Handles: The Essential Link Between Form and Function Cabinet Door Pull Handles In the intricate composition of a kitchen or any finely crafted space, details are not merely decorative accents; they are the fundamental language of design. Among these, cabinet door pull handles hold a position of singular importance. They are the definitive point […]

Cabinet Handle Manufacturers: The Unseen Architects of Functional Beauty Cabinet Handle Manufacturers In the meticulously crafted world of interior design and high-end cabinetry, every visible element receives careful consideration. Yet, behind the seamless integration of style and utility lies a critical partnership with the industry’s true architects of detail: cabinet handle manufacturers. These specialized entities are […]
Custom Cabinet Handles: The Defining Touch of Personalized Kitchen Elegance Custom Cabinet Handles In the heart of every home, the kitchen stands as a testament to both function and style. While grand layouts and premium appliances often capture initial attention, it is the subtle, tactile details that truly complete the narrative of a space. Among […]
Cabinet Handles for Sale: Your Guide to Selecting Lasting Quality with Mebel-alu Cabinet Handles for Sale The search for the perfect finishing touch for your cabinetry often begins with a simple query: cabinet handles for sale. This search reveals a vast and varied marketplace, from mass-produced options to artisanal creations. With so many choices available, the […]

Kitchen Cabinet Hardware Suppliers: The Critical Choice Behind Every Beautiful Kitchen Kitchen Cabinet Hardware Suppliers In the journey of designing or renovating a kitchen, immense attention is given to cabinetry, countertops, and appliances. Yet, the final touch—the hardware that brings it all to life—often hinges on a crucial, behind-the-scenes decision: the choice of kitchen cabinet hardware […]

Custom Cabinet Pulls: Your Signature of Style with Mebel-alu Custom Cabinet Pulls In the world of interior design, true personalization lies not just in the grand statements, but in the curated details that speak uniquely to you. While cabinets form the canvas of your kitchen, bathroom, or living space, it is the hardware—the final point […]

Popular Kitchen Cabinet Handles: Blending Trends with Timeless Quality by Mebel-alu Popular Kitchen Cabinet Handles The kitchen is more than a place for cooking; it’s the heart of the home, a space for connection, creativity, and comfort. Within this space, every element contributes to the overall atmosphere, and few details are as simultaneously functional and […]
Aluminium Cabinet Handle: The Signature of Modern Design by Mebel-alu Aluminium Cabinet Handle In the world of interior design, it’s often the smallest details that make the most profound statement. While we lavish attention on countertops, cabinet finishes, and appliances, there is a subtle yet powerful element that ties everything together: the cabinet handle. More […]

Kitchen Cabinet Edge Pulls: Defining Modern Functionality with Mebel-alu Kitchen Cabinet Edge Pulls In the evolving landscape of kitchen design, where seamless aesthetics meet daily utility, the details that define functionality become paramount. Among these, the choice of how we open our cabinetry is undergoing a thoughtful revolution. Moving beyond traditional knobs or centered bar […]

Flat Cabinet Handles: The Seamless Signature of Modern Design by Mebel-alu Flat Cabinet Handles In the pursuit of a truly cohesive and contemporary interior, the quest for clean lines and unbroken surfaces reigns supreme. This design ethos, celebrated in minimalist, modern, and Scandinavian styles, demands that every element contribute to a sense of calm and […]

Small Cabinet Handles: The Art of Detail in Compact Design by Mebel-alu Small Cabinet Handles In the grand scheme of interior design, it is often the smallest elements that carry the most significant weight in defining a space’s character. While large furniture pieces establish form and function, the finishing details whisper the final, decisive word […]

Modular Kitchen Cabinet Handles: The Perfect Finish for Your Flexible Culinary Space Modular Kitchen Cabinet Handles The modular kitchen has revolutionized home design, offering unparalleled flexibility, efficiency, and a clean, contemporary aesthetic. This intelligent approach to cabinetry allows homeowners to customize layouts, maximize storage, and adapt their space to evolving needs. Yet, the true completion […]

Aluminum Cabinet Handle: Where Modern Design Meets Enduring Strength by Mebel-alu Aluminum Cabinet Handle In the world of interior design and furniture craftsmanship, the smallest details often make the most significant impact. Among these, the humble cabinet handle plays a surprisingly pivotal role. It is the point of contact between user and furniture, a defining […]

Finger Edge Pull: The Epitome of Integrated Design by Mebel-alu Finger Edge Pull In the pursuit of architectural purity and minimalist elegance in interior design, the quest to reduce visual noise leads to a fascinating paradox: how do you open a cabinet without a visible handle? The answer lies in a detail so subtle, so […]

Modern Cabinet Door Handles: The Art of Intelligent Simplicity by Mebel-alu Modern Cabinet Door Handles In contemporary interior design, every element is a conscious decision in service of a cohesive vision. Walls become canvases of texture and light, furniture transforms into functional sculpture, and space itself is curated for flow and feeling. Within this carefully […]
Luxury Cabinet Handles: The Defining Signature of Bespoke Interiors by Mebel-alu Luxury Cabinet Handles In the realm of high-end interior design, true luxury is not announced; it is discovered in the details. It is felt in the weight of a door, seen in the play of light on a flawless surface, and experienced in the […]
Bathroom Cabinet Door Handles: Where Elegance Meets Everyday Resilience by Mebel-alu Bathroom Cabinet Door Handles The bathroom is a sanctuary. It’s a space for renewal, relaxation, and quiet moments at the start and end of each day. Every element within it contributes to the overall atmosphere, from the lighting to the fixtures. Among these, cabinet […]

Cabinet Finger Pull Handles: The Elegant Fusion of Form and Function by Mebel-alu Cabinet Finger Pull Handles In the world of modern interior design, especially within the kitchen and bathroom, the quest for a seamless, streamlined aesthetic is paramount. The clean lines, unbroken surfaces, and minimalist appeal define contemporary spaces. This pursuit has led to […]

Handles for Cabinets and Drawers: The Essential Touchpoint of Design and Function Handles for Cabinets and Drawers In the intricate tapestry of interior design, particularly within the heart of the home—the kitchen and beyond—the significance of hardware is often profound yet quietly understated. Handles for cabinets and drawers represent far more than simple mechanisms for […]

Profile Handles for Kitchen Cabinets: The Architectural Edge of Modern Design Profile Handles for Kitchen Cabinets In the pursuit of a truly cohesive and intentional kitchen design, every element must contribute to a unified whole. While color, texture, and layout form the foundation, it is often the subtle, three-dimensional details that complete the architectural narrative. […]

Modern Kitchen Cabinet Pulls: The Art of Minimalist Functionality Modern Kitchen Cabinet Pulls In the evolving narrative of kitchen design, the modern aesthetic stands as a testament to the power of “less is more.” It is a philosophy that strips away the ornate to celebrate clean lines, thoughtful functionality, and the intrinsic beauty of materials. […]

Kitchen Cabinet Pull Handles: Defining Style and Ensuring Function Kitchen Cabinet Pull Handles In the heart of the home, where functionality meets family, every detail contributes to the overall harmony and efficiency of the space. While cabinetry forms the shell of your kitchen’s storage, it is the kitchen cabinet pull handles that give it life, […]

Kitchen Cabinet Door Pulls: The Unsung Heroes of Your Dream Kitchen Kitchen Cabinet Door Pulls When designing or renovating a kitchen, our focus often zooms in on the grand elements: the countertops, the cabinets, the appliances. Yet, nestled between these significant features lies a detail so crucial it can make or break the entire aesthetic […]

Cabinet Drawer Handles Cabinet Drawer Handles In the architecture of a living space, cabinet drawer handles are the definitive touchpoint. They are the first point of contact, the detail the hand seeks intuitively, and the finishing note that completes a room’s composition. Far more than utilitarian hardware, they are the jewelry of furniture—a subtle yet […]

Modern Edge Pulls Modern Edge Pulls In the evolving narrative of interior design, where clean lines and uncluttered spaces reign supreme, the pursuit of modernity is defined not by grand gestures, but by meticulous refinement. It is found in the elimination of the superfluous and the elevation of the essential. At Mebel-alu, a visionary brand […]

Cabinet and Drawer Pulls Cabinet and Drawer Pulls In the anatomy of fine furniture, cabinet and drawer pulls are more than mere hardware; they are the handshake between design and dweller, the tactile punctuation in a sentence of style. At Mebel-alu, a brand dedicated to pioneering the future of aluminum furniture, we regard these essential […]

Cabinet Edge Pulls Cabinet Edge Pulls In the architectural symphony of a well-designed room, cabinetry provides the foundational rhythm. It offers structure, storage, and defines spatial character. Yet, it is the hardware—the precise point of human interaction—that composes the melody. At Mebel-alu, where innovation in aluminum furniture meets timeless design, we believe the choice of […]
J Profile Handle J Profile Handle In the world of modern furniture, where minimalist design meets robust functionality, the smallest details often make the most significant impact. At Mebel-alu, a brand synonymous with innovation and quality in aluminum furniture, we understand this principle intimately. One such detail, the unassuming yet crucial J profile handle, exemplifies our […]

Modern Cabinet Handles: Defining the Contemporary Kitchen with Mebel-alu Modern Cabinet Handles The philosophy of modern design is rooted in the principles of simplicity, functionality, and clean aesthetics. It’s a style that strips away the superfluous to highlight the essential beauty of form, material, and space. In a contemporary kitchen or living area, where this […]
Cabinet Pull Handles: The Mebel-alu Synthesis of Precision and Design Cabinet Pull Handles In the detailed architecture of interior spaces, from the kitchen to the home office, it is the subtle, recurring elements that often define the character of a room. Among these, cabinet pull handles stand as silent sentinels of style and functionality. They are the […]

Kitchen Cabinet Door Handles: The Defining Touch by Mebel-alu Kitchen Cabinet Door Handles The kitchen is the heart of the home—a place of creation, conversation, and connection. Within this space, every element contributes to the overall atmosphere, from the countertops to the lighting. Yet, one of the most expressive and frequently interacted-with features is often […]

Aluminium Handle Manufacturers: The Unseen Artistry of Mebel-alu Aluminium Handle Manufacturers In the world of furniture and interior design, we often celebrate the grand elements: the sweeping curve of a sofa, the rich grain of a wood tabletop, or the bold color of a cabinet. Yet, it is frequently the smallest components that dictate the […]

Furniture Handle Factory: The Mebel-alu Standard of Craftsmanship and Scale Furniture Handle Factory In the intricate ecosystem of furniture manufacturing, every component plays a vital role. While the spotlight often falls on the wood, the laminates, or the overall design, it is the hardware—the final touchpoints—that truly complete the user experience. Behind every smooth-gliding drawer […]

Pull Handle Aluminium: Mebel-alu’s Signature in Modern Hardware Pull Handle Aluminium In the detailed landscape of furniture design, where every element contributes to the overall narrative, the pull handle plays a pivotal role. It is the point of physical interaction, the detail that guides the hand and defines the user’s tactile experience. When this essential […]

Aluminum Alloy Handles: The Mebel-alu Standard for Modern Furniture Aluminum Alloy Handles In the realm of furniture design and hardware, the choice of material is not merely a technical consideration—it is the foundation upon which beauty, durability, and user experience are built. Among the various options available, aluminum alloy has emerged as a premier material, […]

Furniture Handle Manufacturer: Mebel-alu – Defining Spaces with Precision and Style Furniture Handle Manufacturer In the world of furniture design, the smallest details often make the most significant impact. While the structure, material, and finish of a cabinet or drawer are fundamental, it is the hardware—the handles—that truly complete the piece, defining its character and […]

Furniture Handle Supplier: Mebel-alu – Your Partner in Quality and Design Furniture Handle Supplier In the intricate world of furniture creation and interior design, every component matters. While the primary structure of a cabinet or drawer defines its form, it is the hardware—the handles—that truly completes its function and character. These essential elements are the […]

Pull Handle Manufacturer: Mebel-alu – Crafting the Perfect Touch for Modern Interiors Pull Handle Manufacturer In the world of furniture and interior design, the smallest details often make the most significant impact. Among these details, pull handles stand as unsung heroes, bridging the gap between functionality and aesthetic appeal. As a leading pull handle manufacturer, Mebel-alu […]

Aluminium Kitchen Door Handles: The Smart Choice for Lasting Beauty and Performance Aluminium Kitchen Door Handles The kitchen is a symphony of choices, where every element, from the largest appliance to the smallest detail, contributes to the final harmony. Among these details, the humble door handle plays a surprisingly crucial role. It is the most […]

The Aluminum Glass Door Handle: Where Modern Elegance Meets Structural Integrity The Aluminum Glass Door Handle In the realms of contemporary architecture and interior design, few pairings are as iconic as aluminum and glass. This combination speaks a language of lightness, transparency, and clean lines. Yet, the point where these two materials meet—specifically at the […]
Kitchen Aluminium Profile Handle: The Modern Designer’s Choice for Form and Function Kitchen Aluminium Profile Handle In the world of kitchen design, where every detail contributes to the overall aesthetic and experience, the choice of hardware is paramount. Moving beyond the conventional, a new standard has emerged for those seeking a seamless blend of contemporary […]

Kitchen Counter Handles: The Definitive Touchpoint for Style and Function Kitchen Counter Handles The kitchen counter is the heart of the home—a stage for meal preparation, casual conversations, and morning coffee. Every element on this stage matters, from the countertop material to the appliances. But one detail, often overlooked, plays a surprisingly pivotal role in […]

Your Ultimate Guide to Choosing Kitchen Handle Suppliers for a Flawless Finish kitchen handle suppliers The devil is in the details, and nowhere is this truer than in kitchen design. While we meticulously select cabinets, countertops, and appliances, the humble kitchen handle often doesn’t get the spotlight it deserves. Yet, these small hardware pieces are […]

Aluminium Kitchen Handles: Where Lasting Performance Meets Modern Elegance Aluminium Kitchen Handles The kitchen is more than just a room; it is the bustling heart of the home, a place of creation, connection, and daily life. In this dynamic environment, every element must strike a careful balance between enduring style and unwavering resilience. Among these […]
Furniture Pull Handles: The Art of Detail in Design and Daily Life Furniture Pull Handles In the world of interior design and furniture craftsmanship, the most profound statements are often made not by the grandest elements, but by the smallest. Furniture pull handles are a testament to this truth. These unassuming components, the points where […]

Modern Furniture Handles: The Defining Touch in Contemporary Design Modern Furniture Handles In the narrative of a well-designed space, every element contributes to the story. The sweep of a floor, the texture of a wall, the silhouette of a sofa—all play their part. Yet, it is often the most intimate and frequently touched details that […]
Aluminum Pull Handles: The Perfect Fusion of Strength and Style for Modern Interiors Aluminum Pull Handles In the meticulous craft of furniture design, every component tells a story. While the broad surfaces of a cabinet or the frame of a drawer capture initial attention, it is the subtle, tactile details that truly define the user’s […]

Modern Pull Handles: The Unsung Heroes of Contemporary Furniture Design Modern Pull Handles In the world of interior design, it’s often the smallest details that make the most significant impact. While we lavish attention on color palettes, material textures, and statement furniture pieces, there is a subtle yet powerful element that bridges the gap between […]

The Aluminium Pull Handle: Defining Elegance and Durability in Modern Interiors The Aluminium Pull Handle In the intricate world of furniture design, where every detail contributes to the overall narrative of a space, few elements are as crucial as the pull handle. It is the bridge between user and furniture, a point of daily interaction […]

Kitchen Furniture Handles: The Ultimate Guide to Elevating Your Culinary Space Kitchen Furniture Handles The kitchen is the heart of the home—a place of creation, conversation, and cherished daily rituals. While we meticulously select cabinets, countertops, and appliances, there is one element that often doesn’t receive the attention it truly deserves: the kitchen furniture handles. […]

Kitchen Pull Handle: The Subtle Art of Defining Your Culinary Space Kitchen Pull Handle The heart of the home is undoubtedly the kitchen. It’s a place of creation, connection, and daily ritual. While we often focus on the large elements—the cabinetry, the countertops, the appliances—it is the smallest details that truly orchestrate the room’s character […]
Aluminum Handles: The Definitive Guide to Modern Furniture’s Essential Detail Aluminum Handles In the meticulous world of furniture design, true luxury is found not only in the grand silhouettes but in the considered details. The elements your hand touches daily—the pulls on your kitchen cabinets, the handles on your wardrobes—serve as the functional jewelry of […]

Aluminium Handles: The Unsung Heroes of Modern Furniture Design Aluminium Handles In the world of interior design, we often celebrate the grand elements: the statement sofa, the elegant dining table, or the luxurious bed frame. Yet, it is frequently the smallest details that orchestrate the symphony of a room’s aesthetic and functionality. Among these, aluminium […]

The Invitation of Mebel-alu In the 27th INTERMOB in Istanbul Turkey in Sep 25-28, 2025.

We warmly invite you to visit our booth at CIFF & Interzum (Guangzhou) 2025, taking place from 28 to 31 March 2025, at China Import and Export Fair Complex, Guangzhou.

We would like to invite you to join us at the 26th INTERMOB in Istanbul Turkey from 12 Sep to 15 Sep 2024.
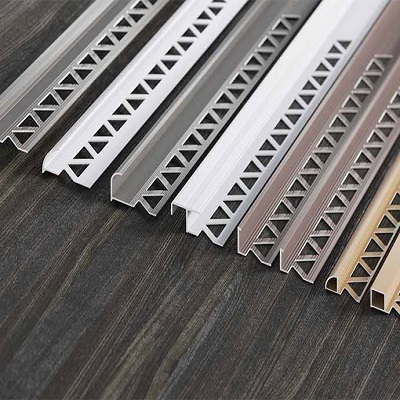
Creative tile edge trims not only provide a finished look but also protect the tile edges from damage and wear.

Sleek and handleless Gola profiles offer a streamlined look, enhancing the minimalist appeal that is highly sought after in modern kitchen designs.

Among the various materials available, aluminium profiles have emerged as a popular and advantageous option for modern kitchen cabinets.

We warmly invite you to visit our booth at CIFF & Interzum (Guangzhou) 2024

We would like to invite you to join us at the 25th INTERMOB in Istanbul Turkey from 30 Sep to 03 Oct 2023. Our booth number 514C in hall 5. We prepare our latest color chart book for all the clients. Come to see our latest products and share the ideas about the trend in […]
Contact Us


